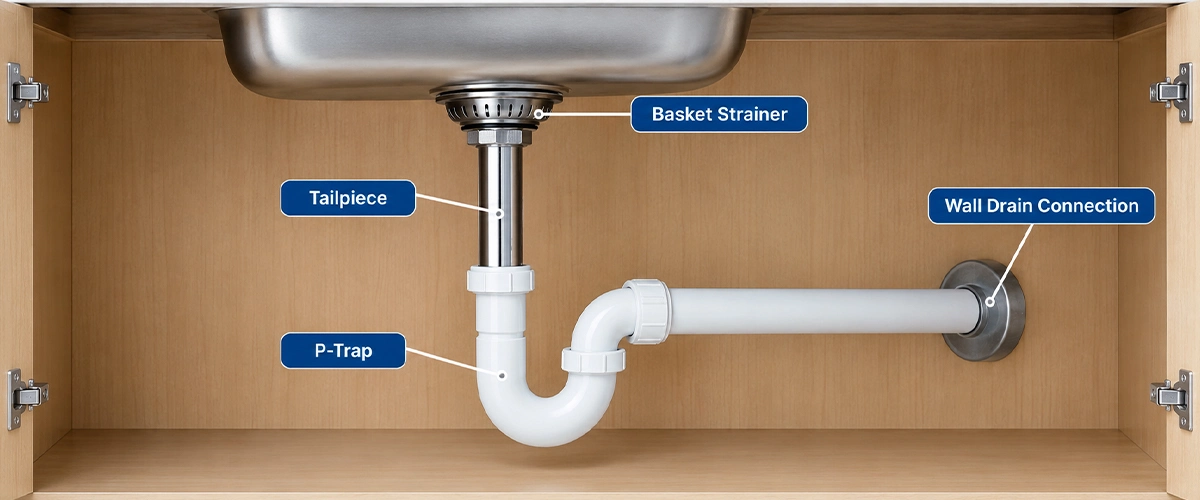
Look under your sink and follow the water. It drops through the strainer, runs down a short straight pipe called a tailpiece, curves through the P-trap, and leaves the drain pipe in the wall. This path is the heart of any sink strainer pipe setup. This blog shows how to connect the kitchen sink to the drain pipe without leaks and how to check when something drips.
What Parts Connect the Kitchen Sink to the Drain?
The basket that sits in the drain hole is the strainer, and the visible rim around it is the flange. Below the sink, a rubber or fiber gasket seals it against the basin, and a big locknut pulls it tight. The tailpiece hangs under that. This short, straight section carries water from the sink strainer down into the P-trap.
Next comes the P-trap, a curved bend that always holds a little water. This water blocks the sewer smell. From the trap, the line runs into the drain pipe where it meets the wall. Slip nuts and tapered washers join the pipe, so they unscrew for cleaning. Everything in your kitchen sink plumbing depends on these small seals. If you are looking for a sink strainer pipe replacement in Lake Forest, the tailpiece is the part you will usually need to check first.
What Tools and Materials Do You Need?
Grab an adjustable wrench, slip-joint pliers, a bucket, and rags. A strainer wrench helps but is not required. You may also need a new gasket and washers, plus plumber’s putty or silicone, depending on the strainer manufacturer’s instructions. Check the strainer’s instructions before picking one. Some brands want putty, others want silicone, and putty can stain natural stone. If the old kitchen sink strainer pipe is cracked, replace it too.
How to Connect Kitchen Sink to Drain Pipe?
Step 1
Clear the space. Clear everything out of the cabinet, then put a bucket under the trap. It always holds some water and gunk.
Step 2
Take off the old trap. Loosen the slip nuts at both ends and slide it off. Snap a photo first so you remember the layout. Replace any cracked plastic or corroded metal.
Step 3
Pull the old strainer. Unscrew the locknut from below and push the strainer up and out. Scrape off all the old putty, then wipe the opening clean and dry. Leftover grit is a common reason for new strainers to leak.
Step 4
Set the new strainer. Press putty under the flange, or use silicone if the manufacturer says so. Seat the strainer, then add the gasket and locknut from below. Hold the strainer still from above while you tighten it so it does not twist and smear the seal.
Step 5
Add the tailpiece. The tailpiece is the short pipe that connects the kitchen sink strainer to the P-trap. If you are replacing a sink strainer pipe, check that the new tailpiece matches the existing drain assembly. Some thread onto the strainer, others use a slip nut. If it is too long, cut it so it does not hit the bottom of the trap.
Step 6
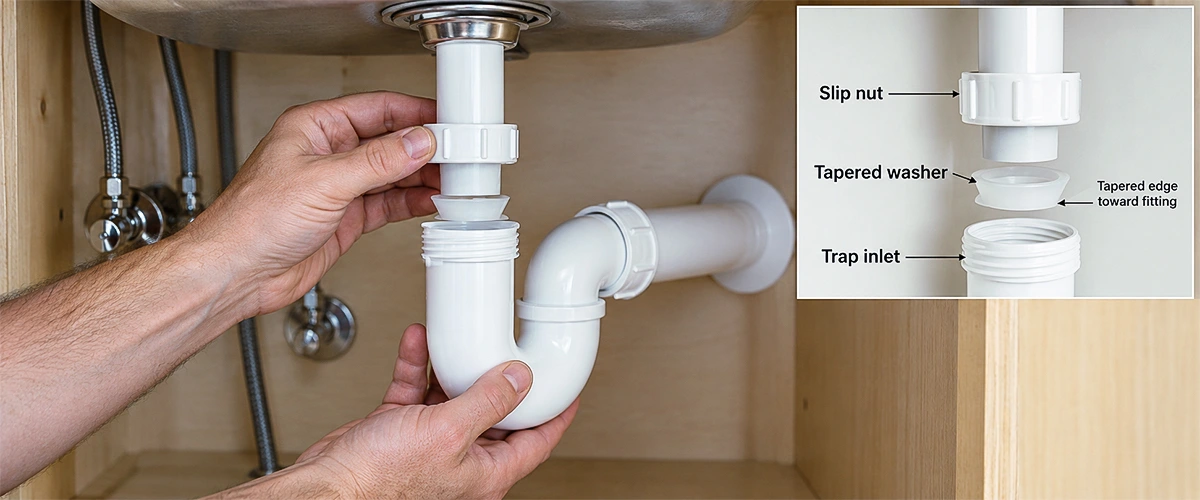
Fit the P-trap. Slide the slip nut onto the tailpiece first, followed by the washer in the correct position for the fitting. Set the trap over the tailpiece and adjust the height until the parts meet on their own. If you are pulling or pushing hard to line things up, stop.
Step 7
Join the drain pipe. Repeat the connection. Install the slip nut and washer properly. Make sure you make the connection properly before joining the pipe. Keep in mind the drain assembly lines up naturally. There should be no force or pipe bending.
Step 8
Make sure you tighten the connection. Firstly, tighten the connection by hand and then give more turns if required. Go easy with the wrench on plastic parts, because too much force can split them.
Step 9
Test for leaks. Fill the sink with some water, then release it and let it drain while you check each connection underneath. Run a dry paper towel around the strainer and lockout, the tailpiece, and both ends of the P-trap and the wall connection. Even a small drip at the sink drain connection means something needs adjusting.
What Does Proper Sink Drain Plumbing Look Like?
The path is quite simple. Water leaves the sink through the strainer, drops through the tailpiece, passes the P-trap, and ends up in the drain pipe. Proper sink drain plumbing looks a little boring. A good sink drain connection has pipes that line up, nothing bent sideways, and nothing wet. Pipes forced into place won’t seal evenly and will drip eventually.
Common Sink Strainer Pipe Connection Problems
Around the strainer or under the locknut
The top seal has failed. Old putty, a crooked gasket, or a loose locknut are the usual causes. Tightening the locknut alone rarely fixes a bad seal.
At the tailpiece or P-trap
Start with the washer and see if it’s gone, upside down, or worn. Then check the nut for cross-threading, make sure the slip nut is snug, and look over the strainer pipe for cracks.
Other causes are less obvious. A loose sink drain connection can develop over time, especially around a garbage disposal. A trap or wall connection at the wrong height can also leave the pipes misaligned. Also, overtightening can crack plastics and damage threads. If the sink drains slowly after installation, check for a poorly aligned trap or a tailpiece that was cut incorrectly. A small leak should still be fixed before it causes water damage.
Common Mistakes to Avoid
- Installing the gasket or washer backwards
- Reusing flat or hard washers
- Cranking nuts with a wrench
- Leaving old putty or grit on the sink opening
- Skipping the leak test
When Should You Call a Plumber?
A strainer swap is simple. Other problems are not. Call a plumber if:
- The wall drain pipe looks damaged or badly corroded.
- New parts would not line up.
- The joint keeps leaking after new washers.
- Water backs up after installation. Check the cabinet floor for softness, swelling, or mold.
- You can’t tell which sink strainer, pipe, or other parts you need.
If the drain parts do not line up, a connection keeps leaking, or you cannot identify the problem, Parzival Plumbing can inspect your kitchen sink plumbing and fix the issue. If a clog is causing the problem, drain cleaning may be the better place to start. For a leak that is getting worse quickly, our emergency plumbing services in Orange County are available.
Final Thoughts
A leak-free sink strainer pipe connection comes down to a few basics. Clean the sink opening, seat the gasket correctly, use fresh washers, and let the pipes meet without force. Once you understand how to connect a kitchen sink to the drain pipe, the job mainly comes down to clean connections, proper alignment, and a careful leak test before you refill the cabinet. If the parts would not line up, the leak keeps coming back, or you are unsure if the setup is right, Parzival Plumbing can check your drain assembly and fix it properly. Reach out to us at 949.229.7550 for kitchen sink strainer installation services in Costa Mesa. We respond promptly to all service calls.